Lower back pain is more than an inconvenience; it’s a barrier standing between you and the active life you love. For active adults, this means missing PRs in the gym, getting sidelined from CrossFit, or feeling that familiar ache after a round of golf. You’ve likely tried the standard advice: rest, ice, and some generic stretches. The problem is that temporary relief isn't a long-term solution. The pain almost always returns because most approaches fail to address the root cause, which is often a combination of dysfunctional movement patterns and a lack of specific core stability, not just a "weak" back.
This article cuts through the noise. Instead of offering another round of quick fixes, we are breaking down the best exercises for lower back pain relief that build a resilient, pain-free foundation. We focus on movement-based rehab designed to correct the underlying issues, a philosophy we apply daily at Valhalla Performance to help active adults in Marlton, Mount Laurel, Cherry Hill, and across South Jersey get back to their lives stronger than before.
Here, you will learn not just what to do, but why these specific exercises are so effective for people who train. We'll provide step-by-step instructions, detail common form errors to avoid, and show you how to integrate them into a smarter training plan. It’s time to stop chasing symptoms and start building a permanent solution to your back pain.
1. Dead Bug Exercise
The Dead Bug might have a strange name, but it’s one of the most effective exercises for teaching you how to stabilize your spine without placing any load on it. Its power lies in its ability to force your deep core muscles to work while your limbs move—the exact skill you need to protect your back during a heavy squat or deadlift. This exercise establishes "proximal stability for distal mobility": creating a rock-solid trunk so your arms and legs can move freely and powerfully.

For a weightlifter, the Dead Bug is a powerful activation drill to fire up the core before a training session, promoting a stronger brace and reducing injury risk. For a CrossFit athlete, it builds the core control needed to stay stable during high-rep Olympic lifts or gymnastics movements. It directly counteracts the poor motor control and core weakness that are often the root cause of chronic back pain in active individuals.
How to Perform the Dead Bug
- Starting Position: Lie on your back with your knees bent at 90 degrees and shins parallel to the floor (tabletop position). Extend your arms straight up toward the ceiling.
- The Movement: Exhale and brace your core, pressing your lower back firmly into the floor. Slowly lower your right arm and left leg toward the floor simultaneously. Go only as far as you can without your lower back arching off the floor.
- Return: Inhale as you bring your arm and leg back to the starting position with control.
- Repeat: Alternate sides, lowering your left arm and right leg on the next repetition.
Key Tips for Success
- Maintain Contact: The most important cue is to keep your lower back glued to the floor. If you feel it start to arch, you’ve gone too far. Reduce your range of motion.
- Move Slowly: This is not a race. The slower you move, the more your deep stabilizing muscles have to work to control the movement.
- Breathe: Coordinate your breath with the movement. Exhale as you lower your limbs and inhale on the return. This helps maintain intra-abdominal pressure and core stability.
Expert Insight: The Dead Bug is foundational because it trains your core's anti-extension function. Your brain learns to prevent your lumbar spine from arching—a critical pattern for protecting your back during overhead presses, squats, and even running.
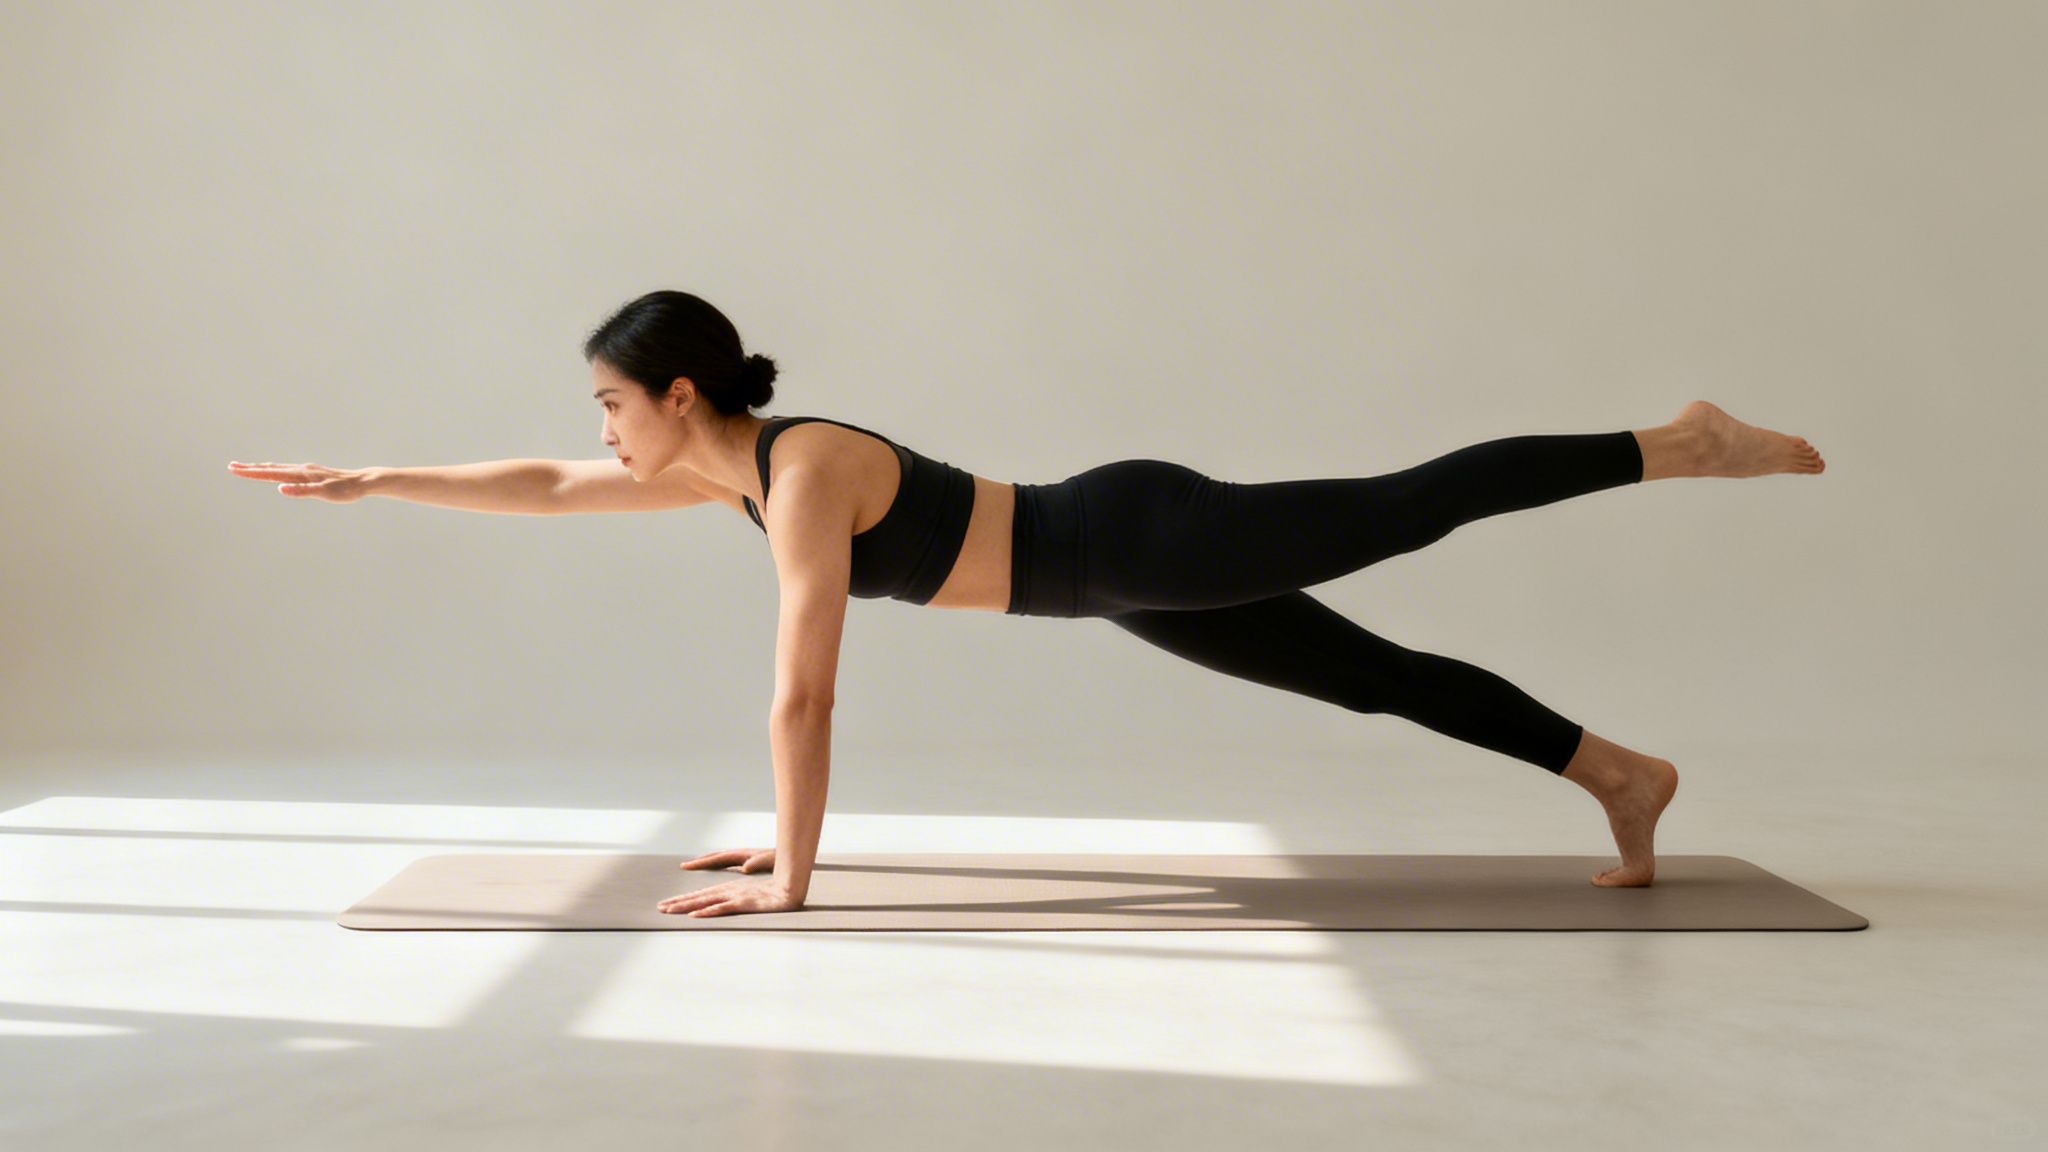
2. Bird Dog (Quadruped Limb Raises)
The Bird Dog is a staple in high-performance rehab for a reason. From a hands-and-knees position, this exercise challenges your core to resist both rotation and extension, building exceptional stability from your shoulders to your hips. Its primary value for lower back pain comes from strengthening the entire posterior chain, including the glutes and spinal erectors, which act as a powerful support system for your spine. It teaches your brain and body to work as an integrated unit, preventing the unwanted spinal "wobble" that often leads to pain.
This exercise directly addresses common imbalances that plague active adults. For runners, strengthening the glutes with the Bird Dog corrects the pelvic instability ("hip drop") that can cause back pain during a long run. For golfers or tennis players, the anti-rotation component improves torso control, allowing for a more powerful and safer swing generated from the hips, not the lower back. It’s a must-do for building a truly athletic core.
How to Perform the Bird Dog
- Starting Position: Begin on all fours with your hands directly under your shoulders and your knees directly under your hips. Keep your spine neutral—no excessive arching or rounding.
- The Movement: Brace your core. Slowly extend your right arm straight forward and your left leg straight back simultaneously, creating a straight line from your fingertips to your heel.
- Hold and Return: Pause for a 2-3 second count at full extension, focusing on keeping your hips and shoulders perfectly level. Inhale as you slowly return to the start with control.
- Repeat: Alternate sides, extending your left arm and right leg on the next repetition.
Key Tips for Success
- Hips Level: Imagine a glass of water is balanced on your lower back—don't spill it. The number one goal is to prevent your hips from rotating or hiking up.
- Glute Squeeze: Initiate the leg lift by squeezing your glute muscle. The movement should come from the hip, not by arching your lower back.
- Neutral Spine: Do not let your lower back sag. Keep your core tight to maintain a flat, stable back throughout the entire movement.
- Controlled Pace: Slower is better. Fast, jerky movements use momentum and defeat the purpose of building muscular control and stability.
Expert Insight: The Bird Dog is one of the best exercises for lower back pain relief because it builds anti-rotation stability. This skill is vital for protecting your spine during dynamic activities, from picking up a heavy sandbag to executing a powerful kettlebell swing.
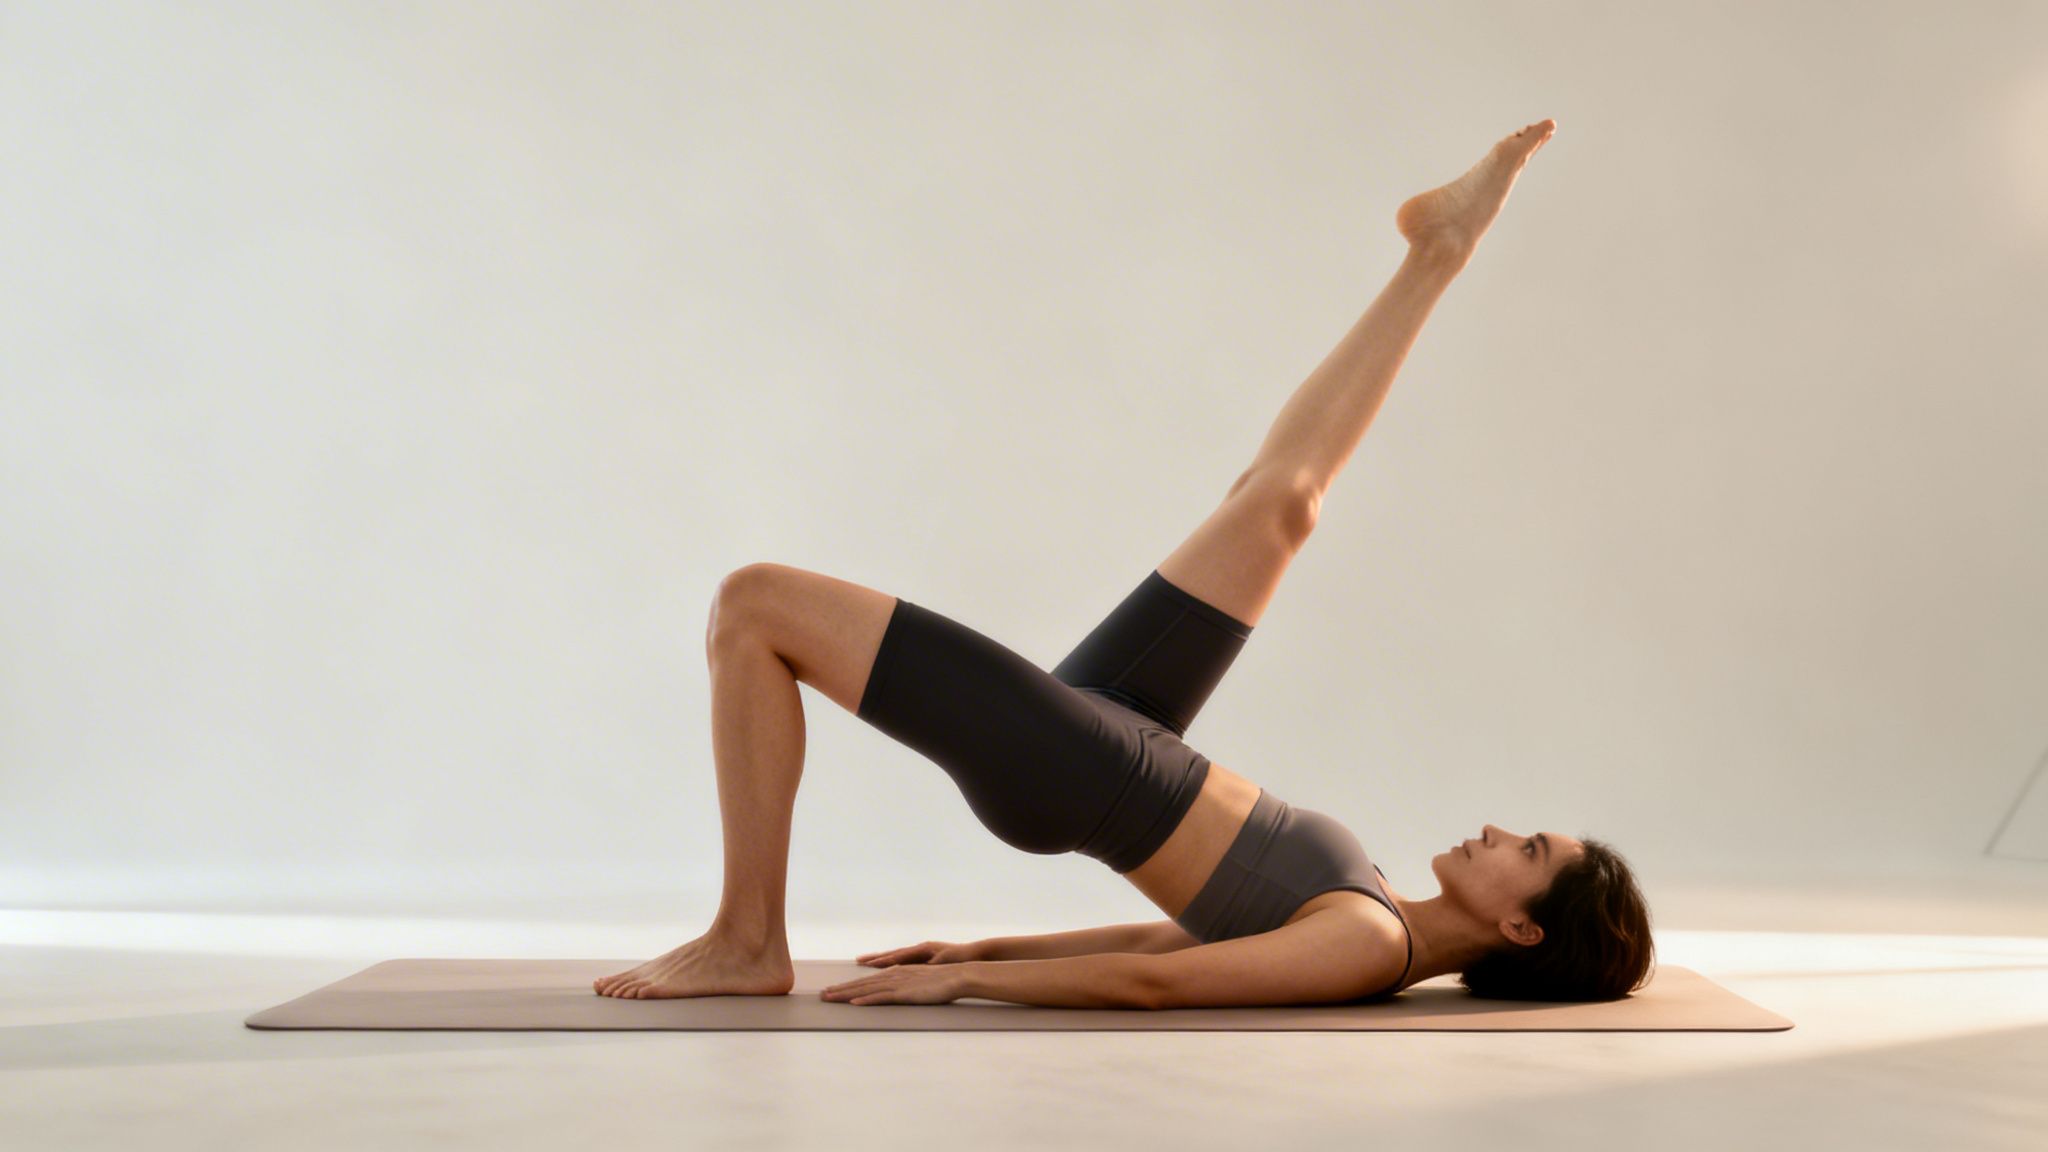
3. Glute Bridge and Single-Leg Variations
Weak or inactive glutes ("gluteal amnesia") are a primary driver of lower back pain in active individuals. When your glutes don't fire properly during movements like squatting, running, or jumping, your body compensates by overusing the hamstrings and, more critically, the lower back muscles. The Glute Bridge directly combats this dysfunctional pattern by isolating and strengthening the glutes, teaching them to be the primary driver of hip extension.
For a powerlifter, this means a stronger lockout on your deadlift without relying on lumbar hyperextension. For a CrossFit athlete, mastering single-leg variations builds the unilateral stability needed for pistol squats and running, reducing injury risk. Waking up your glutes is one of the most effective ways to offload a sensitive lower back and address a root cause of pain, not just the symptom.
How to Perform the Glute Bridge
- Starting Position: Lie on your back with your knees bent, feet flat on the floor about hip-width apart, and arms by your sides. Your heels should be close enough to your glutes to allow a strong push.
- The Movement: Exhale and drive through your heels to lift your hips off the floor. Squeeze your glutes powerfully at the top to create a straight line from your shoulders to your knees. Avoid arching your lower back.
- Hold and Return: Hold the peak contraction for 1-2 seconds. Inhale as you slowly lower your hips back down with control.
- Progression (Single-Leg): Once proficient, lift one foot off the floor. Perform the movement by driving through the planted heel, keeping your hips perfectly level.
Key Tips for Success
- Drive Through Heels: Pushing from your heels ensures you are targeting the glutes and hamstrings, not your quads or lower back.
- Squeeze at the Top: The peak contraction is where the magic happens. Consciously squeeze your glutes as hard as you can without hyperextending your spine.
- Keep Hips Level: Especially during single-leg variations, fight the urge to let one hip drop. This is a crucial core stability challenge.
- Rep Range: Aim for 2-3 sets of 12-15 repetitions. Focus on quality and feeling the glutes burn.
Expert Insight: The Glute Bridge directly trains powerful hip extension, a fundamental human movement. Weak hip extension forces the lumbar spine to compensate, leading to chronic pain and dysfunction. Mastering the bridge helps reprogram this faulty pattern.
4. Quadruped Rocking (Cat-Cow Progression)
Quadruped Rocking and its dynamic progression, the Cat-Cow, are fundamental movements for restoring gentle motion to a stiff, painful lower back. These exercises work by mobilizing the spine through a controlled range of motion without the stress of vertical loading (like standing or sitting). This process helps hydrate the intervertebral discs, reduces stiffness, and teaches you how to control your spine segment by segment—a key skill for preventing future flare-ups.
These movements are invaluable for active adults. For a weightlifter, using Cat-Cow as part of a warm-up prepares the spine for the demands of heavy lifting. For anyone waking up with significant stiffness after a hard training day, a few minutes of Quadruped Rocking can provide immediate relief and improve mobility for the rest of the day. It's one of the best exercises for lower back pain relief during the acute phase, setting the stage for more advanced strengthening.
How to Perform the Quadruped Rocking and Cat-Cow
- Starting Position: Begin on all fours with your hands under your shoulders and knees under your hips. Your back should be in a neutral, flat position.
- Quadruped Rocking: Keeping your spine neutral, slowly rock your hips backward toward your heels. Move only as far as you can without your lower back rounding or feeling pain. Inhale as you return to the start.
- Cat-Cow Movement: From the start, exhale and round your spine toward the ceiling, tucking your chin (the "Cat" position). Then, inhale and slowly arch your back, dropping your belly and lifting your head and tailbone (the "Cow" position).
- Repeat: Move smoothly between the Cat and Cow positions for 10-15 reps.
Key Tips for Success
- Move with Intention: These are not speed drills. Perform each rep slowly, focusing on the movement of each spinal segment.
- Pain-Free Range: Never force the movement into a painful range. The goal is gentle mobilization, not aggressive stretching.
- Sync with Breath: Your breath guides the movement. Exhale fully as you round into "Cat" and inhale deeply as you arch into "Cow."
- Focus on the Whole Spine: Try to initiate the movement from your tailbone and let it ripple up your entire spine, rather than just bending from your lower back.
Expert Insight: The ability to move one vertebra at a time ("spinal segmentation") is a skill often lost with chronic pain. Cat-Cow is a direct way to retrain this motor control. If you're in the South Jersey area (Marlton, Mount Laurel, Cherry Hill, etc.) and find that your pain and stiffness persist, it signals a deeper issue that a generic exercise can't fix.
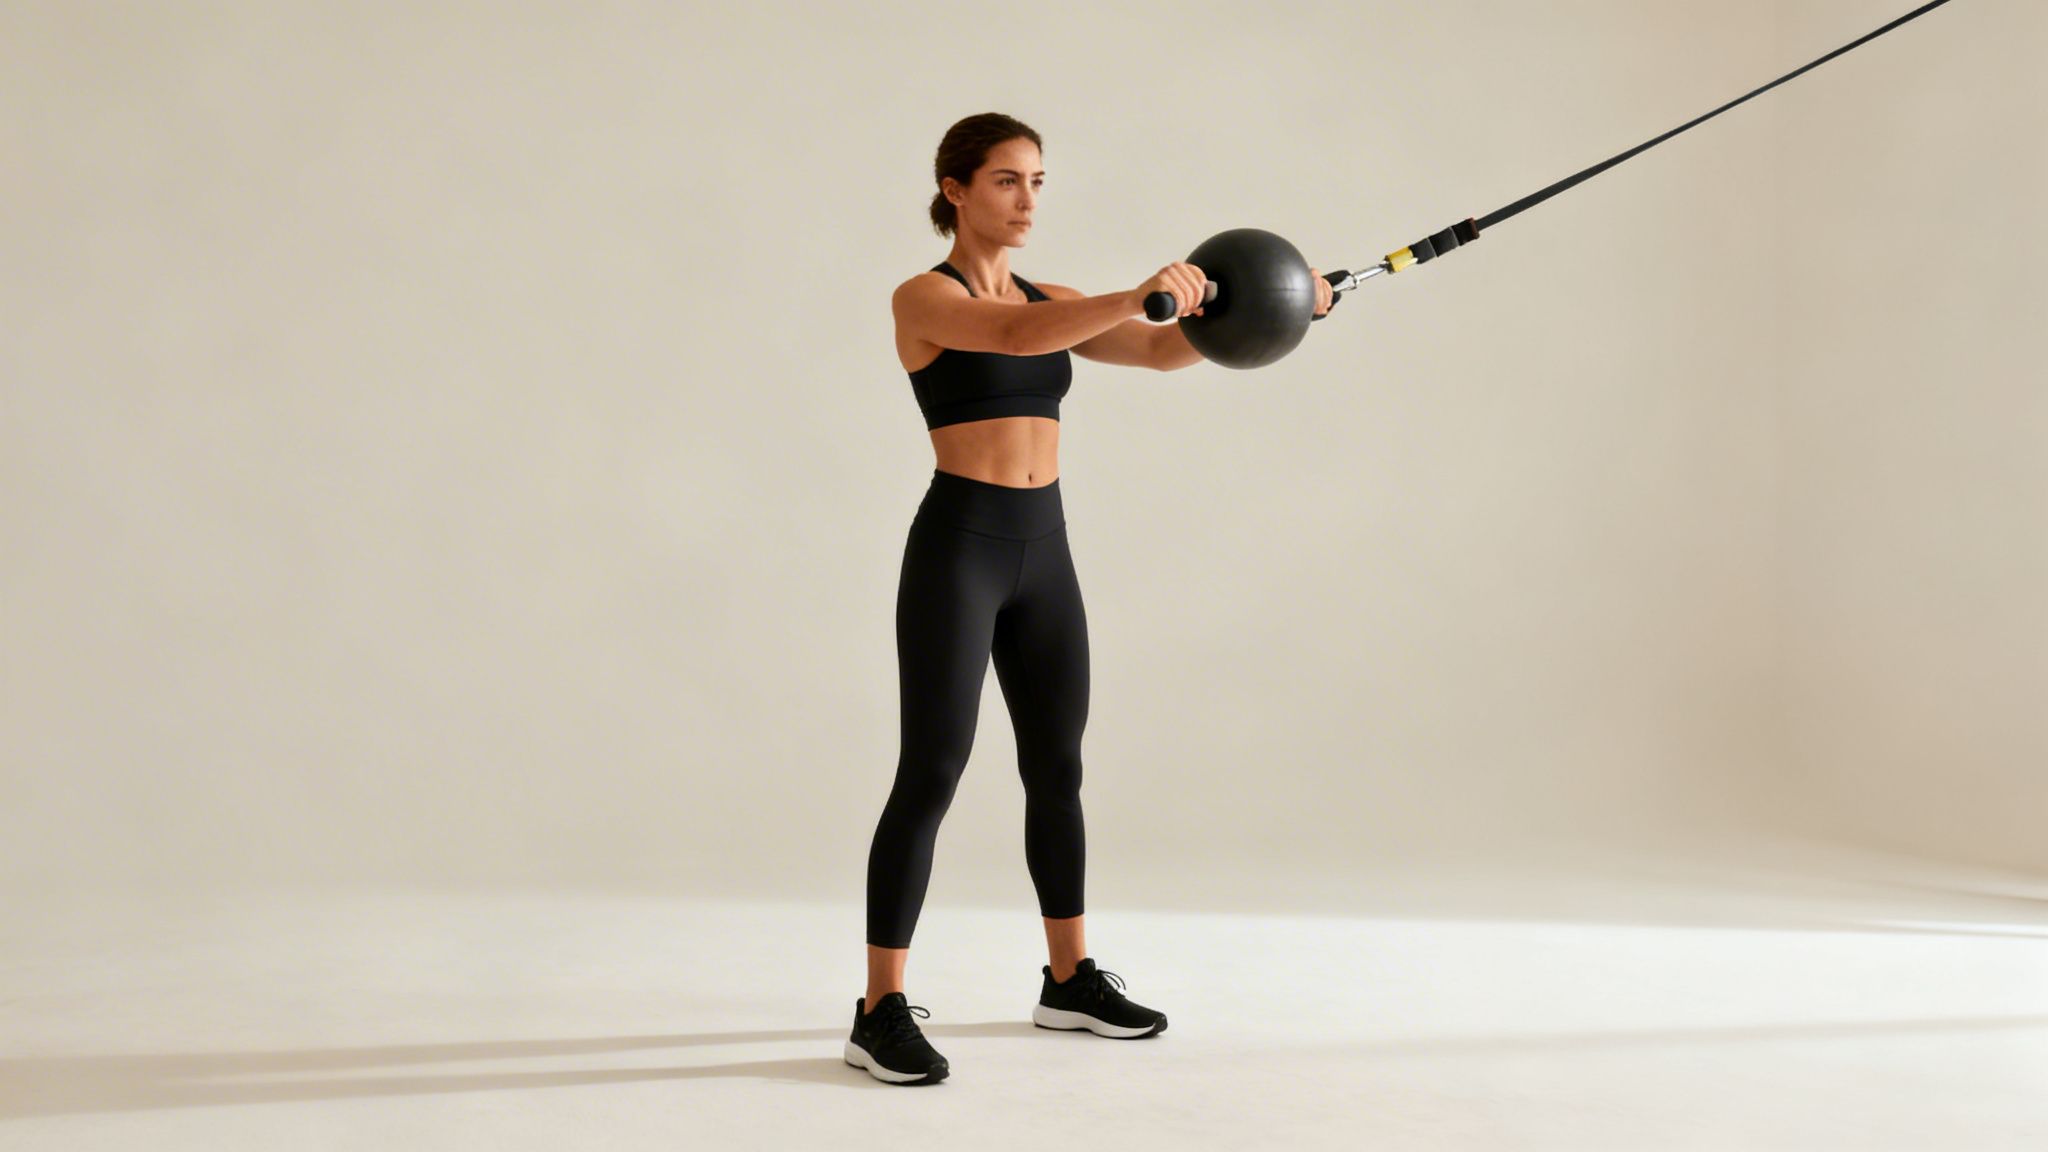
5. Pallof Press (Anti-Rotation Core Exercise)
The Pallof Press is a cornerstone exercise for building a truly bulletproof core. Its purpose is to train "anti-rotation"—your core's ability to resist twisting forces. Many back injuries in the gym or in sports don't happen from lifting heavy weight straight up; they occur when there's an unexpected twist under load, like during a rotational med ball throw or when losing balance in a squat. The Pallof Press directly trains your body to prevent this unwanted, dangerous spinal movement.
This exercise is incredibly functional. For athletes in sports like golf, baseball, or hockey, it builds the core stability needed to produce powerful rotation through the hips and torso, not the vulnerable lower back. For the weightlifter, it reinforces the 360-degree core brace needed to safely lift heavy loads. It’s the logical next step after mastering floor-based exercises like the Dead Bug and is one of the best exercises for lower back pain relief when returning to dynamic training.
How to Perform the Pallof Press
- Starting Position: Stand perpendicular to a cable machine or resistance band anchor set at chest height. Grab the handle with both hands, pull it to the center of your chest, and step away to create tension. Stand with feet shoulder-width apart, knees slightly bent.
- The Movement: Brace your core. Exhale and slowly press the handle straight out in front of your chest. The resistance will try to twist you; your job is to resist it.
- Hold: Hold the extended position for a 1-2 second count, keeping your hips and shoulders perfectly square.
- Return & Repeat: Inhale as you slowly bring the handle back to your chest. Perform all reps on one side before switching.
Key Tips for Success
- Fight the Twist: Your core's main job is to prevent your torso from rotating toward the anchor. Keep your hips and shoulders pointing straight ahead.
- Neutral Spine: Keep your rib cage down and avoid arching your lower back as you press out. Maintain a proud chest without letting your back hyperextend.
- Quality Over Quantity: Start with light resistance. The goal is to feel the work in your obliques and deep abs, not to fight the weight with bad form.
- Symmetrical Training: Always perform an equal number of sets and reps on both sides to correct and prevent muscular imbalances.
Expert Insight: The Pallof press teaches the core its primary role: a force transfer center that prevents energy leaks and protects the spine. If you've been doing endless crunches and still have back pain, it’s likely because you lack anti-rotation strength. This exercise directly fills that gap.
6. McGill Curl-Up (Modified Sit-Up for Lower Back Safety)
The traditional sit-up creates massive compressive forces on the lumbar spine, often making back pain worse for active individuals. The McGill Curl-Up, developed by world-renowned spinal biomechanist Dr. Stuart McGill, is the intelligent alternative. It’s engineered to strengthen the abdominal muscles while minimizing the dangerous spinal flexion and disc compression that make full sit-ups a high-risk choice for anyone with a sensitive lower back.
This exercise isn't about range of motion; it's about precise muscle activation while maintaining spinal stability. It retrains your core to function as a stiff, protective corset without aggravating underlying issues. For anyone who has experienced a disc-related injury, it's a foundational step in safely rebuilding core endurance, making it one of the safest and best exercises for lower back pain relief.
How to Perform the McGill Curl-Up
- Starting Position: Lie on your back with one leg straight and the other knee bent with your foot flat on the floor. This helps maintain a neutral spinal curve. Place your hands, palms down, under the small of your back for support and feedback.
- The Movement: Brace your abdominal muscles. Gently lift only your head and shoulders a tiny bit off the floor, keeping your neck stiff and in line with your spine. Think of your head, neck, and torso moving as one solid unit.
- Hold: Hold this braced, slightly lifted position for 7-10 seconds while breathing steadily.
- Repeat: Slowly lower back to the floor. Perform a set number of reps, then switch which leg is bent and repeat.
Key Tips for Success
- No Neck Strain: Do not lead with your chin. The movement comes from your abs, not your neck. Keep your neck and torso locked together.
- Minimal Lift: You are only lifting your head and shoulder blades an inch or two off the floor. Any higher engages the hip flexors and flexes the spine, which defeats the purpose.
- Feel the Feedback: Your hands under your lower back are a guide. You should not feel your back pressing down harder into them as you lift.
- Breathe: It is critical to take shallow breaths while holding the contraction. Holding your breath increases unwanted pressure and is not functional.
Expert Insight: Dr. McGill's research shows that building core endurance is more important for back health than building maximal strength. The McGill Curl-Up, when held for time, does exactly that. It teaches your abdominal wall to stay braced for sustained periods, which is how it needs to function to protect you during a long WOD or a full 18 holes of golf.
7. Farmer's Carry (Loaded Core Stability)
The Farmer's Carry is a deceptively simple yet brutally effective exercise for building a truly resilient lower back. It involves walking for distance or time while holding heavy weights. Its power for treating lower back pain comes from its ability to challenge your entire core to maintain a neutral, stable spine under a dynamic, real-world load. This exercise bridges the gap between basic rehab drills and the demands of sport and life.
For an athlete returning from a back injury, it's a fantastic way to re-introduce load safely and build the postural endurance needed to resist fatigue and maintain form during a game or competition. For anyone in a physically demanding job or sport, it directly builds the capacity to handle heavy, awkward objects safely. It's one of the best exercises for lower back pain relief when transitioning back to high-intensity training.
How to Perform the Farmer's Carry
- Starting Position: Place two heavy dumbbells or kettlebells on the floor. Hinge at your hips with a flat back to grip the handles. Stand up by driving through your legs, not pulling with your back.
- The Movement: Once standing, pull your shoulders back and down, keep your chest up, and brace your core to create a "rigid" torso. Begin walking forward with controlled, deliberate steps.
- Maintain Posture: Your goal is to walk without letting the weights pull you side-to-side or cause your posture to break. Fight the urge to shrug your shoulders or lean.
- Completion: Walk for a set distance (e.g., 50 feet) or time, then safely lower the weights by reversing the initial lifting motion.
Key Tips for Success
- Posture is Paramount: The main goal is maintaining an upright, neutral spine. If your form breaks down, the set is over.
- Start Appropriately: Begin with a moderate weight you can control. Progress by increasing weight first, then distance.
- Walk with Purpose: Avoid shuffling. Take strong, stable steps and look straight ahead to keep your spine aligned.
- Unilateral Variation: To increase the challenge, try a single-arm "Suitcase Carry." This forces your obliques to work overtime to prevent side-bending toward the weight.
Expert Insight: The Farmer's Carry teaches your core muscles to fire reflexively to protect your spine against shifting loads—a critical skill for preventing re-injury during unpredictable movements in sports. It builds functional strength that translates directly into real-world resilience.
8. Half-Kneeling Rotational Exercises (Pallof Hold, Half-Kneeling Chop)
Moving into a half-kneeling position is a critical step in building a truly functional core. These exercises teach your body to resist unwanted twisting through the lower back, a primary cause of disc injuries and chronic pain. The split stance (one knee down) narrows your base of support, forcing your deep core stabilizers, glutes, and hips to work together to prevent you from toppling over—a skill that translates directly to sports like baseball, golf, and tennis.
For athletes, these drills are essential. A baseball player can build rotational control for a powerful, safe throw. A golfer can groove a swing that doesn't put excessive torque on the lumbar spine. For a CrossFit athlete, this stability is key for single-arm kettlebell work and rotational movements. Mastering this control is a key part of the best exercises for lower back pain relief and performance enhancement.
How to Perform the Half-Kneeling Pallof Hold
- Starting Position: Set a cable or band at chest height. Kneel on a pad and step one foot forward, creating 90-degree angles at your front knee, back knee, and hips. Your body should be perpendicular to the anchor. Grab the handle with both hands and pull it to the center of your chest.
- The Movement: Engage your core and squeeze the glute of your downed leg. Slowly press the handle straight out, resisting the band's pull to rotate you. Hold this extended position, keeping your hips and shoulders square.
- Return: With control, bring the handle back to your chest.
- Repeat: Perform all reps on one side before switching your kneeling stance and facing the opposite direction.
Key Tips for Success
- Stay Upright: Maintain a tall posture. Avoid leaning away from the anchor point. The goal is to resist rotation, not to lean.
- Squeeze Your Glutes: Actively squeezing the glute of the downed leg will help stabilize your pelvis and lock in your position.
- Control Your Breathing: Breathe steadily throughout the hold. Do not hold your breath.
- Lumbar Spine is Silent: All the work should come from your core and hips. Your lower back should not move, arch, or twist. If you feel it in your back, reduce the resistance.
Expert Insight: Anti-rotation is non-negotiable for a healthy back. The half-kneeling position exposes imbalances between your left and right sides and challenges your core in a way that is often neglected. This is how you build the functional strength needed to return to weightlifting, sports, and an active life without fear of re-injury.
8-Exercise Comparison for Lower Back Pain Relief
| Exercise | Implementation complexity | Resource requirements | Expected outcomes | Ideal use cases | Key advantages |
|---|---|---|---|---|---|
| Dead Bug | Low — beginner-friendly but requires precise form | None (mat optional) | Improved core engagement and neutral spine control | Acute/chronic low-back pain, early rehab, activation drills | Very safe, low spinal compression, easily modified |
| Bird Dog (Quadruped Limb Raises) | Low–Medium — requires balance and shoulder stability | None (mat optional) | Posterior chain strength, anti-rotation stability, better proprioception | Progression to functional movement; runners, rotational athletes | Functional carryover, strengthens glutes and balance |
| Glute Bridge (and Single‑Leg) | Low–Medium — single‑leg increases demand | None to bands/weights for progression | Increased glute strength, improved hip extension, reduced lumbar load | Glute weakness, runners, sedentary individuals, rehab progression | Addresses root cause (glute weakness), highly scalable |
| Quadruped Rocking (Cat‑Cow Progression) | Very low — mobility-focused, easy to learn | None | Enhanced spinal mobility, disc hydration, safe lumbar mobilization | Acute pain phases, warm‑up, morning stiffness | Pain‑safe mobility, low load, excellent prep exercise |
| Pallof Press (Anti‑Rotation) | Medium — standing technique and posture important | Cable machine or resistance band | Anti‑rotation core stability, improved core endurance, sport carryover | Rotational athletes, progressed rehab, standing stability work | High functional relevance, easily loadable, detects asymmetries |
| McGill Curl‑Up | Low — simple but requires cueing to protect spine | None | Rectus abdominis endurance with minimal lumbar compression | Post‑disc injury rehab, chronic back pain sufferers, older adults | Biomechanically safe alternative to sit‑ups, research‑backed |
| Farmer's Carry (Loaded Core Stability) | Medium — requires load management and posture control | Dumbbells/kettlebells/loaded implements | Loaded core stability, grip strength, postural endurance under load | Return to work/sport with load, strength conditioning, functional tasks | Exceptional functional carryover, time‑efficient, highly scalable |
| Half‑Kneeling Rotational Exercises | Medium–High — balance, hip stability and coordination required | Cable machine or resistance band, padded knee support | Rotational stability, integrated hip‑core control, sport‑specific transfer | Throwing/swinging sports, advanced rehab, asymmetry correction | Sport‑specific, trains asymmetrical/rotational demands, progressive loading |
Stop Guessing, Start Solving: Your Path to a Pain-Free Life in South Jersey
We've walked through a powerful collection of the best exercises for lower back pain relief, from foundational drills to dynamic, loaded movements. Each one represents a critical piece of the puzzle in building a resilient, pain-free back. You now have a solid understanding of how to engage your deep core, stabilize your spine, and improve motor control—the very building blocks of durable, long-term results.
Lasting relief isn't about finding one "magic" exercise. It's about diagnosing the root cause of your pain and building a system of support around your spine. Think of it less like patching a hole and more like reinforcing the entire foundation so it never breaks again.
From Knowledge to Action: Identify Your Weak Link
These exercises are your tools, but they're only effective if you know which problem you're trying to solve. A generic list, no matter how good, cannot diagnose the specific root cause of your pain.
Is your back pain stemming from:
- Poor Rotational Control? Do you feel a "tweak" when you swing a golf club, throw a ball, or perform a rotational med ball slam? Exercises like the Pallof Press and Half-Kneeling Chop are essential for you.
- Weak Glutes and Poor Hip Extension? If your glutes aren't firing properly during squats and deadlifts, your lower back is taking over a job it wasn’t designed for. This is where mastering the Glute Bridge and its single-leg variations becomes a game-changer.
- Core Endurance Deficits? Can you brace for a heavy lift but lose that stability during a long run or the final minutes of a WOD? This is where loaded carries and sustained holds come in, building the muscular endurance your spine needs to stay safe under fatigue.
- Faulty Bracing Strategy? Do you rely on just "sucking in" or arching your back to feel stable? The Dead Bug and McGill Curl-Up teach you how to create a true 360-degree brace.
Without a clear diagnosis from a movement expert, you're just guessing. You might be strengthening muscles that are already strong while neglecting the weak links that are the true source of your pain. This is why so many active adults get stuck in a frustrating cycle of temporary relief followed by recurring flare-ups.
The Missing Link: Personalized Diagnosis and Programming
True, long-term results begin when you stop treating the symptom (pain) and start solving the problem (the underlying movement dysfunction). That's where a professional assessment becomes invaluable. An expert can watch you move, identify your unique compensation patterns, and connect them directly to your pain and your performance goals in the gym or your sport.
"A plan built for everyone is a plan built for no one. Your pain, your body, and your goals are unique. Your recovery plan must be, too."
This is the philosophy at Valhalla Performance. We don't just hand you a sheet of exercises. We conduct a thorough evaluation to uncover the why behind your pain. We then build a completely individualized program that bridges the gap from injury to performance. We teach you not just what to do, but how to move better in everything you do, from deadlifting in the gym to living your life outside of it.
For our active clients in Marlton, Mount Laurel, Cherry Hill, Moorestown, Haddonfield, Medford, and across South Jersey, this means a definitive end to the chronic pain cycle. It means getting back to CrossFit, weightlifting, or your sport with confidence, not fear. It means building a body that is not just pain-free, but stronger and more resilient than ever before. If you've tried generic physical therapy or chiropractic adjustments and are still stuck with the same issues, it's time for a different approach that’s built for long-term results.
Your journey to a stronger, more capable body starts here. Stop guessing and start solving.
Ready to uncover the root cause of your back pain and get a personalized plan for long-term results? If you are an active adult in the Marlton, Mount Laurel, Cherry Hill, Moorestown, Haddonfield, Medford, or South Jersey area, we invite you to schedule a Free Discovery Visit with the team at Valhalla Performance. Let's find out if our approach is the right fit to help you move from chronic pain to peak performance.